Showing posts with label Microsoft 365. Show all posts

Wednesday, 30 April 2025

What's new in Microsoft Intune: April 2025

Microsoft Intune's April 2025 release introduces several enhancements aimed at improving device management and security:

Custom Naming for Android Enterprise Devices - Administrators can now create custom naming templates during Android Enterprise device enrollment. This feature allows the inclusion of fixed text and device-specific variables (like serial numbers), promoting consistency and reducing post-enrollment renaming efforts.


Enhanced Controls for Apple Devices - Intune expands its Mobile Application Management (MAM) capabilities for unmanaged iOS devices. New Application Protection Policies (APP) now allow administrators to:
  • Block screen captures within the Apple Intelligence app.
  • Control access to AI-driven tools like Writing Tools and Genmojis. These controls help balance user productivity with data security.

Tuesday, 29 April 2025

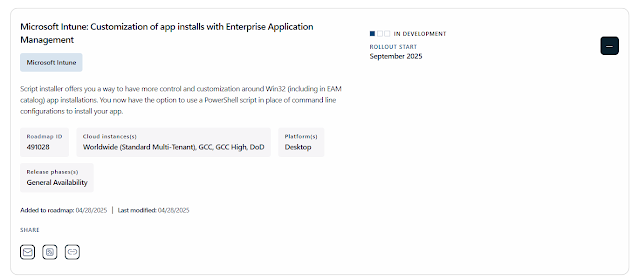
Microsoft Intune: Customization of app installs with Enterprise Application Management (Sep 2025 Rollout Update)

Script installer offers you a way to have more control and customization around Win32 (including in EAM catalog) app installations. You now have the option to use a PowerShell script in place of command line configurations to install your app.


Wednesday, 9 April 2025

Step-by-Step Guide to Changing the Microsoft 365 Apps Update Channel | Microsoft Configuration Manager


Managing the update channels for Microsoft 365 Apps is crucial for IT administrators aiming to control the deployment of new features and updates within their organizations. Microsoft Configuration Manager (ConfigMgr) offers a robust platform to facilitate this process, ensuring devices receive updates in alignment with organizational policies. This guide provides a comprehensive walkthrough on changing the Microsoft 365 Apps update channel using ConfigMgr.

Prerequisites

Before proceeding, ensure the following conditions are met:

  1. Configuration Manager Management: ConfigMgr should be configured to manage the "Click-to-Run" workload for Office applications.

  2. Scheduled Task Activation: The "Office Automatic Update 2.0" scheduled task must be enabled on all client devices to allow automatic detection and application of updates.

  3. Update Deployment Configuration: ConfigMgr should be set up to deploy Microsoft 365 Apps updates. Detailed instructions are available in Microsoft's documentation on managing updates to Microsoft 365 Apps with Configuration Manager.

  4. Administrative Access: Ensure you have the necessary permissions to create applications and device collections within ConfigMgr.

Step-by-Step Guide to Changing the Update Channel

Step 1: Remove Conflicting Group Policies

If there are existing Group Policies that define the Office update channel, they will override settings configured via the Office Deployment Tool (ODT). To prevent conflicts, remove any such Group Policies before proceeding.

Step 2: Deploy Updates for the Target Channel

Create dynamic collections in ConfigMgr to deploy Microsoft 365 Apps updates corresponding to the desired channel. For guidance on setting up these collections, refer to Microsoft's article on switching to Monthly Enterprise Channel with Configuration Manager.

Step 3: Prepare the Office Deployment Tool (ODT)

  1. Download the Latest ODT: Obtain the newest version of the Office Deployment Tool from Download Office Deployment Tool from Official Microsoft Download Center

  2. Extract ODT Files: After downloading, extract the contents of the ODT package. Retain only the setup.exe file and remove other files to avoid confusion.

  3. Create Configuration XML: Craft a configuration XML file (e.g., Configure.xml) specifying the desired update channel. Save this XML in the same directory as setup.exe.

    • For Monthly Enterprise Channel:

      xml
      <Configuration>
      <Updates Channel="MonthlyEnterprise" /> </Configuration>
    • For Current Channel:

      xml
      <Configuration> <Updates Channel="Current" /> </Configuration>

Step 4: Develop a Deployment Script

Create a PowerShell script to automate the channel change process. The script should execute the following actions:

  1. Run ODT with the Configuration XML: This updates the CDNBaseUrl registry key to reflect the new channel.Remove Update Detection Timestamp: Delete the UpdateDetectionLastRunTime registry key to prompt immediate detection of the new policy.

  2. Trigger Scheduled Tasks and ConfigMgr Actions: Initiate the "Office Automatic Updates 2.0" scheduled task and trigger ConfigMgr actions like Hardware Inventory and Software Update Deployment Evaluation.

    Sample PowerShell Script:

    Start-Process -FilePath .\Setup.exe -ArgumentList "/configure .\Configure.xml" -Wait
    Remove-ItemProperty -Path HKLM:\software\Microsoft\Office\ClickToRun\Updates -Name UpdateDetectionLastRunTime -Force Get-ScheduledTask -TaskName "Office Automatic Updates*" | Start-ScheduledTask # Run Hardware Inventory Invoke-WMIMethod -ComputerName $env:COMPUTERNAME -Namespace root\ccm -Class SMS_CLIENT -Name TriggerSchedule “{00000000-0000-0000-0000-000000000001}” # Software Update Deployment Cycle Invoke-WMIMethod -ComputerName $env:COMPUTERNAME -Namespace root\ccm -Class SMS_CLIENT -Name TriggerSchedule “{00000000-0000-0000-0000-000000000108}” # Software Update Deployment Evaluation Cycle Invoke-WMIMethod -ComputerName $env:COMPUTERNAME -Namespace root\ccm -Class SMS_CLIENT -Name TriggerSchedule “{00000000-0000-0000-0000-000000000114}”


Step 5: Create and Deploy the Application in ConfigMgr

  1. Application Creation: In ConfigMgr, create a new application that utilizes the prepared PowerShell script for installation.

  2. Deployment: Deploy this application to the device collection targeted for the channel change.

Step 6: Verification

After deployment, verify the update channel change by:

  • Registry Inspection: Check the UpdateChannel and UpdateChannelChanged values in the HKLM:\SOFTWARE\Microsoft\Office\ClickToRun\Configuration registry path.

  • Office Application: Open any Office application, navigate to the Account menu, and confirm the displayed update channel.

Note: If the Office version remains the same across channels during the transition, the channel description in the Office application may not immediately reflect the change.

By meticulously following these steps, IT administrators can effectively manage and change the Microsoft 365 Apps update channels using Microsoft Configuration Manager, ensuring that devices within the organization receive updates in accordance with specified policies.

Tuesday, 8 April 2025

Strengthening Email Ecosystem: Outlook’s New Requirements for High‐Volume Senders

In an era where email remains a cornerstone of both personal and business communication, ensuring the security and reliability of email ecosystems is paramount. To bolster trust and protect users, Outlook.com is introducing new requirements for domains that send over 5,000 emails per day. These measures aim to enhance email authentication and reduce malicious activities such as spoofing, phishing, and spam.

New Authentication Requirements for High-Volume Senders

Effective May 5, 2025, domains dispatching more than 5,000 emails daily to Outlook.com addresses must comply with the following authentication protocols:

  1. Sender Policy Framework (SPF):

    • Ensure that your domain's DNS records accurately list all authorized IP addresses and hosts permitted to send emails on behalf of your domain.

    • SPF records must pass validation to confirm the legitimacy of the sending source.

  2. DomainKeys Identified Mail (DKIM):

    • Implement DKIM to attach a digital signature to your emails, verifying that the message content remains unaltered during transit.

    • DKIM signatures must pass verification to authenticate the integrity and origin of the emails.

  3. Domain-based Message Authentication, Reporting, and Conformance (DMARC):

    • Configure a DMARC policy with at least a p=none setting, aligning with either SPF or DKIM (preferably both).

    • DMARC enables domain owners to specify how unauthenticated messages should be handled, providing reports on email authentication status.

For detailed guidance on setting up these authentication methods, refer to Microsoft's documentation on email authentication.

Additional Email Hygiene Best Practices

Beyond authentication, high-volume senders are encouraged to adopt the following practices to maintain email quality and user trust:

  • Valid P2 (Primary) Sender Addresses:

    • Ensure that the "From" or "Reply-To" addresses are valid, accurately reflect the sending domain, and are capable of receiving replies.

  • Functional Unsubscribe Mechanisms:

    • Provide clear and accessible options for recipients to opt out of future communications, especially in marketing or bulk emails.

  • Regular List Maintenance and Bounce Management:

    • Periodically cleanse mailing lists to remove invalid or inactive addresses, thereby reducing bounce rates and spam complaints.

  • Transparent Mailing Practices:

    • Use honest subject lines, avoid misleading headers, and ensure that all recipients have explicitly consented to receive your emails.

Adhering to these practices not only enhances deliverability but also fortifies the sender's reputation within the email ecosystem.

Enforcement Timeline and Actions

Starting May 5, 2025, Outlook.com will begin routing emails from non-compliant high-volume senders to recipients' Junk folders. This initial phase serves as a grace period, allowing senders to address and rectify any authentication issues. Future enforcement actions may escalate to outright rejection of non-compliant emails, with specific dates to be announced subsequently.

Outlook.com reserves the right to take negative actions, including filtering or blocking, against senders who fail to meet these standards, particularly in cases of significant authentication breaches or poor email hygiene.

Steps to Prepare

To align with these new requirements and ensure uninterrupted email delivery:

  1. Audit Your DNS Records:

    • Review and update your SPF, DKIM, and DMARC records to ensure they meet the specified standards.

  2. Monitor Authentication Headers:

    • Regularly inspect email headers to verify authentication status. Guidance on viewing and interpreting these headers is available through Microsoft's support resources.

  3. Stay Updated:

    • Keep abreast of further announcements regarding enforcement timelines and additional requirements by following official communications from Outlook.com.

By proactively implementing these measures, high-volume senders can contribute to a more secure and trustworthy email environment, benefiting both senders and recipients alike.

Tuesday, 18 October 2022

How to Download - Microsoft 365 and Office 365 Official Icons

  1. Login to https://fasttrack.microsoft.com/en-us/portal.html
  2. Go to resources
  3. Tick the Downloads check box
  4. Click on "Download the branding tookit" to download all official Microsoft icons.

The Microsoft 365 and Office 365 toolkit offers icon assets and naming standards for use solely in Microsoft 365 and Office (Office 2019) onboarding training for places that do not currently offer Microsoft 365. Please follow the Microsoft Trademark and Brand Guidelines, as well as the FastTrack licencing agreement included in the kit.


Thursday, 1 September 2022

Office subscription licensing exception error code 0x5

Please try below steps to resolve the error "Office subscription licensing exception error code 0x5":

Step 1: Check System for Corruption/Check System Integrity:
  1. Press Windows + R
  2. Type cmd and Press Enter.
  3. Type "sfc/scannow" and press enter.
Note: Run cmd as administrator

Step 2: Update to latest Windows KB
  1. To check for Windows Updates (Windows XP, Vista, 7, 8, and 10):
  2. Click the Start button.
  3. Type "update" into the search box and hit ENTER.
  4. The Windows Update dialog box will appear.
  5. If updates are available, click the Install Updates button.
Step 3: Clean up Junk Files
  1. Press Win + R
  2. Type "Cleanmgr" and Press Enter.
  3. Select the OS Drive and Press ok.
  4. Finally Click on Clean up System Files
In most cases, the office subscription licencing exception error code 0x5 error should have been resolved by now; however, if the problem persists, please have your system checked by a professional. And if you have any other solution please leave it in comments. Thank you.

Credits: Microsoft Support Group forum

What's new in Microsoft Intune: April 2025

Microsoft Intune's April 2025 release introduces several enhancements aimed at improving device management and security: Custom Naming ...